

CADD PRIZM 6101 – TPN IV Setup
The CADD-Prizm pump is indicated for intravenous, intra-arterial, subcutaneous, intraperitoneal, epidural space, or subarachnoid space infusion.
Demonstration Videos
Guidelines, Specifications & User Manuals
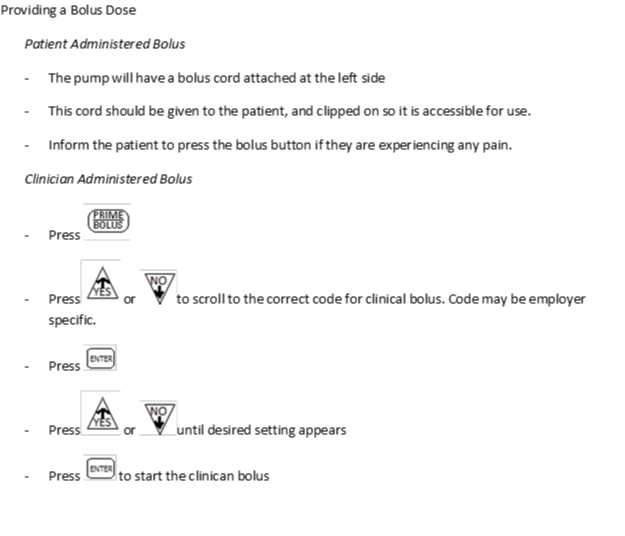
Providing a Bolus Dose
Complete a Shift Check

Disconnecting the pump
• Stop the infusion
• Clamp the tubing and disconnect from the patient
Changing the Batteries
• Stop the pump
• Press the button on the battery door and slide the door forward
• Change the battery and replace the door
The pump with perform a series of self-tests
Troubleshooting Issues
Note: To Silence any alarm press “View/Silence” button. If alarms persist after attempting the corrective action, the pump may need to be replaced or serviced.
Message and Alarms
Description and corrective action.
AC Adapter Unpowered / Check power source
The wall outlet is not providing power. If there is a 9 volt battery installed it will power the pump. Ensure the pump is plugged in properly.
Air Detector Port Cover Removed / Install Cover
The Air Detector port on the side must be attached properly for operation. Ensure this cover is on properly.
Air Detector Fault / Pump will not run
The Air Detector is faulty. Close the tubing, remove the pump from use and replace the air detector.
Air Detector Removed
If intentionally removed press the “Yes” up arrow. If the air detector should be installed press the “No” down arrow and install properly.
Air Detector Required / Pump will not run
Air Detector has not been installed and needs to be. Pump will need to be sent back for biomed correction.
Air in line detected / Pump will not run
Air or bubbles are detected. Make sure the tubing is installed properly. Detach from client to removed any air bubbles prn. Prime to remove bubbles then reconnect and restart.
9 volt Battery Depleted / Install good battery
Replace the battery. See section on how to install battery.
9 volt Battery Low
Battery will need replacing soon.
9 volt Battery Removed / Install good battery
The pump will still run if it has an external power source. Ensure a battery is installed or Install a new battery.
9 volt Battery Removed / Pump will not run
Install a new battery.
AC Adapter Disconnected
The pump has been unplugged. May continue on battery power or plug back in to AC wall outlet
Delivery Too Slow / External power source must be connected
9 volt battery is not providing enough power to run pump. Plug in pump to an AC wall outlet.
Dose Not Delivered / Dose not available when pump is stopped
Pump must be running to deliver a bolus dose. Start the pump and attempt demand dose again.
Dose Not Delivered / Dose Locked Out
A dose has been requested before the lockout period allows. Wait until the lockout time period has passed and attempt dose again. Ensure the lockout is appropriate for pain management and ensure the client knows how to properly use the pump.
Error Detected / E (code)
An error has occurred. Stop and Remove pump from use. Replace.
External Power Source Faulty / Change Power Source
Ensure the AC adapter is properly in the wall outlet. Ensure the outlet is working. If unable to correct and use on battery power, replace pump.
Finished / Please remove cable
Printing has finished and the cable can be removed.
High Pressure
There is a downstream block or kink in the tubbing or problem with the attaching port. If unable to correct with manipulating the tubing, remove and reattach to a new port.
High Volume Admin set not supported in this version of PCA / Remove admin set
The administration set is not correct for this pump. Replace with correct set.
Insufficient External Power Check Power Source
The AC adapter is not receiving adequate power. Ensure cords and cables are properly attached, or recharge the power pack.
Key Stuck / Release Key or Removed power to stop pump
Make sure nothing is pressing down on the key pad. If persists close tubing, remove and replace pump.
Motor is temporarily disabled / remove pump and restart pump
Remove and reinsert the battery and reconnect the external power source. Restart the pump.
Motor Service Due
Remove pump at next cassette change and send pump for servicing.
No Rate or Dose Programmed / Pump will not run
The pump will not start if the program has not been programmed correctly. Follow instructions on how to program the pump.
Non-Epidural Cassette attached / Remove cassette to continue
“No” down arrow was pressed at the screen asking if an epidural cassette was attached. Remove and replace the cassette (with an epidural cassette) to continue.
Possible hardware problem / Service Pump
There may be a problem with the air detector which needs to be replaced. Send for repair.
Power pack depleted / Change power source
The power pack is depleted and unable to support pump operation. Recharge the power pack with the AC adapter. Running on battery power.
Power pack disconnected
The power pack is disconnected from the pump. Reconnect the power pack, attach an AC Adapter, or allow the pump to run on the 9 volt battery power.
Reservoir Volume is zero
A new fluid container must be installed, if appropriate.
Reservoir Volume Low
The fluid container must be replaced soon, if appropriate.
Res Vol Alert / (X) ml remaining / VIEW to continue
A preinstalled low fluid volume has been programmed to promp changing. This value has been reached. Change the fluid container.
Reset Reservoir Volume to (X) ml?
If you wish to reset the reservoir volume to the originally programmed value, press “Yes” up arrow. To leave unchanged press “No” down arrow.
To continue, unlatch and remove the Admin set or reservoir / Then re-attach
The cassette was not completely removed before it was reattached and the pumps sensors did not reset. Remove the cassette fully and reattach.
Upstream Occulsion
Fluid is not flowing from the container to the pump which may be resulting from a kink, closed clamp or air bubble between the container and the pump. Remove the obstruction and resume operation. Press stop and start to see if the problem resolves. Ensure the cannula in the client does not need replacing.
Wrong Cassette
The cassette is damaged, attached improperly, or incompatible with the pump. Close the tubing clamp. Ensure the cassette is properly attached then restart the pump. If the alarm persists you may need a new cassette.
Related Devices
The Perfusor Space 2nd Generation Syringe Pump
The Perfusor® Space 2nd Generation Syringe Pump The Perfusor® Space 2nd Read more...
Elastomeric IV Pump Systems – Instructions
ON-Q PainBuster Post-Op Pain Relief System. ON-Q painbuster pump Read more...
Vista® basic Infusion Pump Instructions
Vista Infusion Pump UPC: 637-202 B. Braun pump sets Read more...
Crono Super-PID subcutaneous pump Instructions
Crono Super PID Ambulatory Syringe Infusion Pump The Crono Read more...
CADD Prizm IV Pump Instructions
CADD® Ambulatory Infusion Systems, The CADD-Prizm® pump is indicated Read more...
TPN Setup with IV pump Instructions
TPN stands for Total Parenteral Nutrition. Healthy Read more...